Hallo, bin ziemlich neu in Php und will ein Programm erstellen, wo man eine Tablle mit Produktgruppe, Datum und Umsatz einliest und das Programm das automatisch als Graphische Tabelle ausgibt, zudem soll das Datum in 4 Quartale sortiert werden.
Ist keine Hausaufgabe!!
Bin noch nicht so weit gekommen:
CSV-Datei:
produktgruppe,datum,umsatz
Tee,01.01.2020,0.76
Kosmetik,01.01.2020,21.65
Tee,02.01.2020,10.10
Gewürze,02.01.2020,18.53
Gewürze,02.01.2020,40.71
Gewürze,02.01.2020,39.06
Kosmetik,02.01.2020,1.65
Tee,03.01.2020,38.03
Kerzen,03.01.2020,41.99
Geschenkkörbe,04.01.2020,13.92
Gewürze,05.01.2020,28.27
Gewürze,05.01.2020,19.84
Kerzen,05.01.2020,19.81
Kerzen,05.01.2020,19.57
Kerzen,05.01.2020,49.97
Kerzen,05.01.2020,14.06
Tee,06.01.2020,42.28
Gewürze,06.01.2020,20.44
Kosmetik,06.01.2020,4.62
Gewürze,07.01.2020,1.28
Kosmetik,07.01.2020,12.46
Gewürze,08.01.2020,9.20
Tee,09.01.2020,32.47
Tee,09.01.2020,4.23
Gewürze,09.01.2020,0.79
Kerzen,09.01.2020,2.97
Kosmetik,09.01.2020,43.68
Kosmetik,10.01.2020,21.67
Kosmetik,10.01.2020,6.44
Tee,12.01.2020,15.09
Vorhandener Programmcode:
print "<table border = 3 cellpadding = 5>";


        foreach($rows as $artikel){
            foreach($artikel as $index=>$wert){
                /* if($zahl % 3){ */
                    /* print "<tr>"; */
                    /* print "$wert<br>"; */
                    print "<th width = 100 align = right bgcolor = green>$wert</th>";
                    /* print "</tr>"; */
                /* }else{
                    print "<br>";
                } */
            }
        }


    print "</table>";
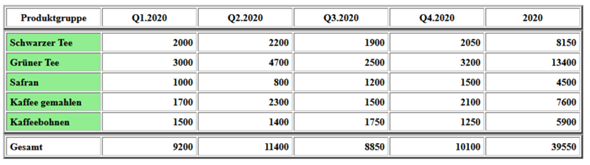
Wie es in ca. ausschauen soll:
Da bei mir das ganze leider nicht wie geplant funkt, bin ich nun auf eure Hilfe angewiesen, vielleicht, hat jemand eine Idee?
Lg