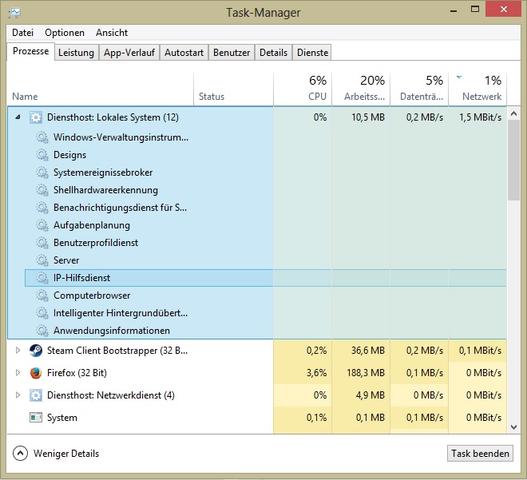
Auslastung des Internet durch Diensthost: Lokales System (15)
Habe seit 2 Tagen das Problem das ich beim Counterstrike Source spielen einen hohen ping (mind. 400) habe. Nachdem ich im Taskmanager geguckt habe was denn das Internet zieht stelte ich fest das der Prozess Diensthost: lokales Sytem (15) o. (14) mein Internet mit 1.5mbit zieht was leider bei meiner schlechten Leitung genug ist damit mein Ping unerträglich wird. Dies war davor nie der Fall und ich kann mir nicht erklären wieso das plötzlich so ist. Natürlich kann ich diesen Prozess nicht einfach so beenden um das Problem zu lösen. Bin auf win 8 falls das wichtig sein sollte. Bitte antwortet wenn ihr eine idee habt wie ich das beheben kann damit ich wieder mit normalem Ping spielen kann, da es so unmöglich ist. hoffe auf schnelle hilfe und schonmal danke im vorraus. mfG crusher2012
2 Antworten
Du musst im Task-Manager den Task "Diensthost: Lokales Sytem" erweitern und dann beim Eintrag Windows Update die Dienste öffnen. Dort dann Doppelklick auf Windows Update und dann bei Starttyp "deaktiviert" auswählen. Das gleiche machst du beim Intelligentewn Hintergrundübertragungsdienst. Du beendest die Task noch einmal und du hast deine Ruhe :)
LG Marco
Vielen lieben dank. jetzt ist meine datenträgerauslastung zwischen 0 und 10.
Noch einen schönen Abend :D
Falls du W8.1 und WLAN nutzt, diese Lösung hat mir geholfen. Irgendwie scannt Windows auch weiterhin, obwohl man schon mit dem Internet verbunden ist, nach Netzwerken.
If you're on Windows 8 or 8.1, all you need to do is access the wireless network list by clicking on the wireless icon on the bottom right and it will automatically refresh. For those on Windows 7, click the wireless icon on the bottom right and click on the refresh button next to your connected network. As you are doing this, you'll notice that the ping counter on the command prompt will spike up. I thought it was an issue with the card as well and I was wondering about getting a replacement as well. It can be ridiculously annoying for gaming. It seems as though Windows likes to re scan for networks periodically causing random lag spikes. If there was a way to stop scanning while you're connected to a network, that would be great.
UPDATE: Oh boy, I was able to find a solution. It involves using the Registry Editor. Be careful not to change anything else except for the things that are listed.
Open Registry Editor (Windows 8/8.1, right click where Start button was, click Run, type regedit. Windows 7, click Start, click Run, type regedit)
Head to 'HKEYLOCALMACHINE \ System\ CurrentControlSet \ Control \ Class \ {4d36e972-e325-11ce-bfc1-08002be10318} [Be sure to expand the 4d36e.... folder]
Inside will be a number of folders named 0000, 0001, 0002, etc. Look through all these folders until you get one that says Intel(R) Dual Band Wireless-AC 7260 in the registry.
Once the device has been found, search for a value called ScanWhenAssociated.
If you see this value, set it to 0 on hexadecimal. If you don't see the value, click edit from the top, select new, and click DWORD (32-bit) value. Rename this value to ScanWhenAssociated (exactly as shown). Make sure this value is set to 0 on hexadecimal.
Restart the computer. This is important. The changes won't take effect unless you do.
Leider benutze Ich windows 10 und eine Lan verbindung. Trotzdem danke ^^